Getting Started with DiscoPygal
1. What is DiscoPygal?
DiscoPygal is a suite of tools that allow for rapid development and experimentation with motion planning in 2D environments. It is developed in Tel Aviv University’s Computational Geometry Laboratory, under the supervision of Prof. Dan Halperin.
Link to page at the lab’s website: https://www.cgl.cs.tau.ac.il/projects/discopygal/
2. How to start?
Install the prerequisites (depending on your platform)
Install Discopygal package from whl file (other methods are for package developers)
Learn how to use the package and especially how to:
Read about the two main tools of the package and how to use them:
3. Prerequisites
Before installing DiscoPygal, depending on your operating system you should install some prerequisites.
3.1. General prerequisites
For any operating system install the following:
At least 8GB RAM (relevant mostly for VM or WSL)
C++ compiler (for example gcc for Linux/mac and visual studio for windows, will be explained at the following)
Python 3.9 (at least) - https://www.python.org/downloads/
Pipenv:
Pipenv is not necessary but highly recommended for easy installation. You can install it by running the following command in cmd/bash:
pip install pipenv
3.2. Ubuntu
Note
Tested with Ubuntu 20.04.3
You should run the following command in bash:
sudo apt-get install libxcd-xinerama0
3.3. macOS
Note
Tested on macOS Big Sur and macOS Monterey, Intel
You should first install homebrew: https://brew.sh
brew install boost-python3
brew install cgal
Install explicitly PyQt5 (For non Apple Silicone users):
pipenv install pyqt5
NOTE: On Apple Silicone Machines, PyQt5 should be installed as following: https://stackoverflow.com/questions/74393139/pipenv-cant-install-pyqt5
3.4. Windows
Note
Tested on Windows 11
You should install the following:
Git for windows (https://gitforwindows.org/ )
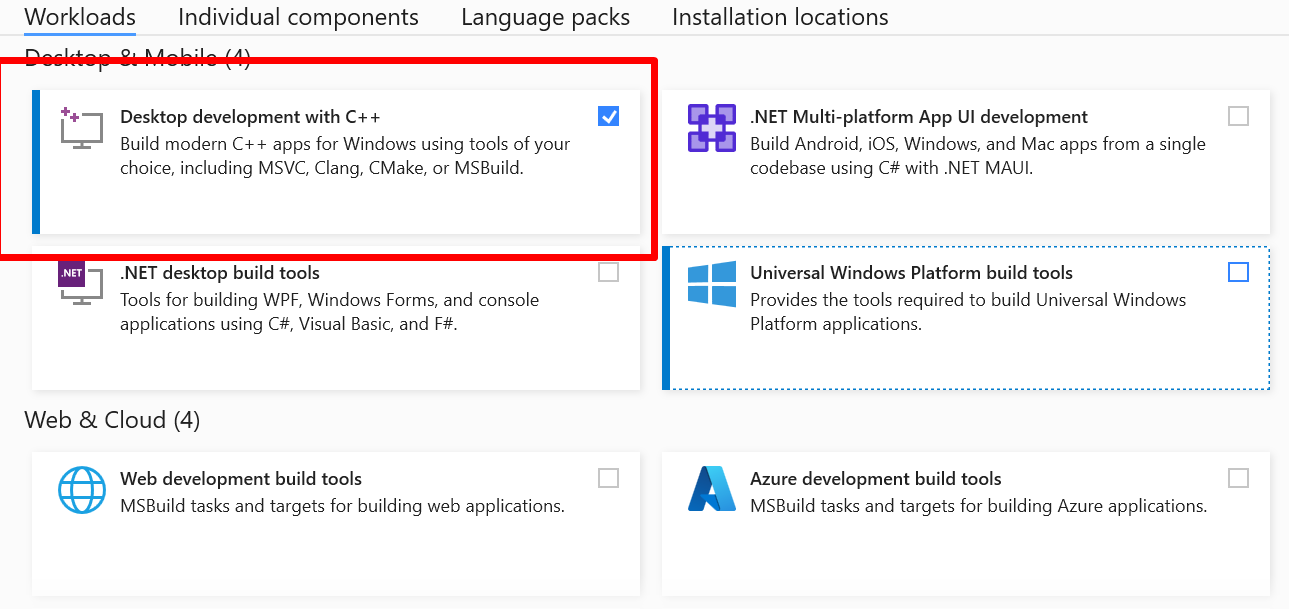
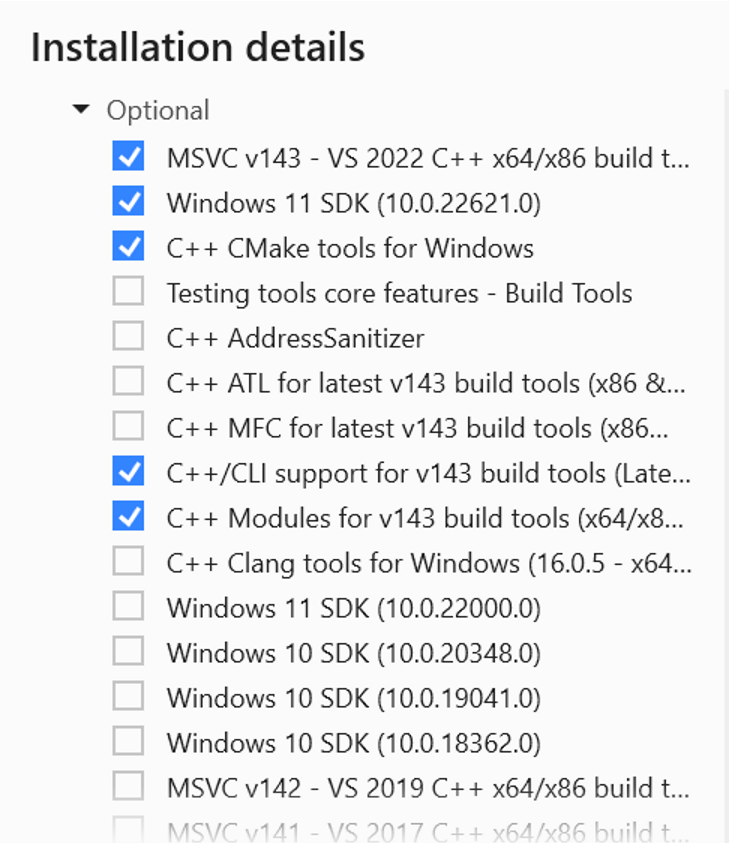
Visual Studio or Visual Studio Build Tools (to have C++ compiler):
If installing Visual Studio Build Tools choose Desktop development with C++
3.5. WSL
Note
Tested on WSL2 for Ubuntu 20
Run the following:
sudo apt install qt5dxcb-plugin
sudo apt install python3.11-dev
4. Installation
Before installing, please make sure you have installed all the necessary prerequisites listed above. Installation can be done from a precompiled wheel or from the sources.
Warning
If encountering any problems check: Troubleshooting
Install with pip the whl file:
pip install <path to .whl file>
This can take up to half an hour!
To uninstall simply run:
pip uninstall discopygal-taucgl
Note
You may want to install the package in a virtual environment (with pipenv or venv) so the installation won’t interfere with the native python packages on your environment.
(make sure to create the virtual env in the directory you want or create a new one for your convenience 😉)
To activate Pipenv at the current directory (also creates a new env if running for the first time):
pipenv shell
Then install the package with the pip command shown before.
To deactivate pipenv:
exit
After installing the discopygal package, when opening a new shell you just need to enter the directory where you have created the virtual env and activate the pipenv shell.
More installation methods for package developers
5. Tools
Execute these commands for running them (might need .exe suffix in Windows):
solver_viewer
scene_designer
For more information see: Using discopygal tools
6. Example: Motion planning in a simple scene
import json

from discopygal.bindings import *
from discopygal.solvers import PathPoint, Scene, RobotDisc, ObstaclePolygon
from discopygal.solvers.rrt import dRRT
from discopygal.solvers.verify_paths import verify_paths
from discopygal_tools.solver_viewer import start_gui

if __name__ == "__main__":
    scene = Scene()

    # Illustration of the scene:
    # Two disc robots in a room, with an obstacle separating them
    # The goal of the robots is to switch positions
    ###############################
    #                             #
    #                             #
    #                             #
    #      0      ###      0      #
    #     000     ###     000     #
    #      0      ###      0      #
    #                             #
    #                             #
    #                             #
    ###############################

    # Add disc robot on the left that wants to go to the right
    left_robot = RobotDisc(
        radius=FT(1.0),
        start=Point_2(FT(-3.0), FT(0.0)),
        end=Point_2(FT(3.0), FT(0.0)))
    right_robot = RobotDisc(
        radius=FT(1.0),
        start=Point_2(FT(3.0), FT(0.0)),
        end=Point_2(FT(-3.0), FT(0.0)))
    scene.add_robot(left_robot)
    scene.add_robot(right_robot)

    # Add obstacle in the middle
    middle_obstacle = ObstaclePolygon(
        poly=Polygon_2([
            Point_2(FT(-1), FT(-1)),
            Point_2(FT(-1), FT(1)),
            Point_2(FT(1), FT(1)),
            Point_2(FT(1), FT(-1))
        ])
    )
    scene.add_obstacle(middle_obstacle)

    # Also add bounding walls
    left_wall = ObstaclePolygon(
        poly=Polygon_2([
            Point_2(FT(-7), FT(-4)),
            Point_2(FT(-7), FT(4)),
            Point_2(FT(-6), FT(4)),
            Point_2(FT(-6), FT(-4))
        ])
    )
    right_wall = ObstaclePolygon(
        poly=Polygon_2([
            Point_2(FT(6), FT(-4)),
            Point_2(FT(6), FT(4)),
            Point_2(FT(7), FT(4)),
            Point_2(FT(7), FT(-4))
        ])
    )
    top_wall = ObstaclePolygon(
        poly=Polygon_2([
            Point_2(FT(-6), FT(3.5)),
            Point_2(FT(-6), FT(4)),
            Point_2(FT(6), FT(4)),
            Point_2(FT(6), FT(3.5))
        ])
    )
    bottom_wall = ObstaclePolygon(
        poly=Polygon_2([
            Point_2(FT(-6), FT(-4)),
            Point_2(FT(-6), FT(-3.5)),
            Point_2(FT(6), FT(-3.5)),
            Point_2(FT(6), FT(-4))
        ])
    )
    scene.add_obstacle(left_wall)
    scene.add_obstacle(right_wall)
    scene.add_obstacle(top_wall)
    scene.add_obstacle(bottom_wall)

    # Export the scene to file
    with open('simple_motion_planning_scene.json', 'w') as fp:
        json.dump(scene.to_dict(), fp)

    # "Solve" the scene (find paths for the robots)
    solver = dRRT(num_landmarks=100, prm_num_landmarks=200, prm_k=15, bounding_margin_width_factor=0)
    solver.load_scene(scene)
    path_collection = solver.solve() # Returns a PathCollection object

    # Print the points of the paths
    for i, (robot, path) in enumerate(path_collection.paths.items()):
        print("Path for robot {}:".format(i))
        for point in path.points:
            print('\t', point.location) # point is of type PathPoint, point.location is CGALPY.Ker.Point_2

    result, reason = verify_paths(scene, path_collection)
    assert result  # Validate path if is valid
    print(f"Are paths valid: {result}")

    # Start solver_viewer with the scene and solver objects (the scene isn't solved yet)
    start_gui(scene, solver)
    print("Ended gui")
7. Troubleshooting
The user’s name installing from must be in english
Run the “pip install” command in verbose mode to see where the problem is:
pip install --verbose ...In case there is a timeout in downloading mpfr package with conan from gnu.org: In the file:
C:\Users\<User name>\.conan\data\mpfr\4.1.0\_\_\export\conandata.ymlreplace the url: https://ftp.gnu.org/gnu/mpfr/mpfr-4.1.0.tar.gz (click on the link to check if doesn’t work)
with the url: https://www.mpfr.org/mpfr-4.1.0/mpfr-4.1.0.tar.gz
In case the compilation of cgal-python-bindings crashes try increasing the RAM size on your machine
In any other case of failure during installation delete the .conan directories created under and start again:
C:\
C:\Users\<User name>\
On linux, if receiving the following error when invoking the gui tools:
Warning: Ignoring XDG_SESSION_TYPE=wayland on Gnome. Use QT_QPA_PLATFORM=wayland to run on Wayland anyway.
...
Then run the following command and then try to use the tools:
export QT_QPA_PLATFORM=waylandOn windows, if pip can’t find git when running it from cmd (even if git it was installed) then make sure PATH environment variable contains the path of git.exe (C:\Program Files\Git\cmd) or run the installation from Git Bash shell (a program that installed with git).

