Using discopygal tools
Discoypgal has two gui main tools:
1. Running the tools
solver_viewer
scene_designer
solver_viewer.exe
scene_designer.exe
If developing or using the sources/repo of discopygal it is possible to directly run these tools with python:
python tools/solver_viewer/solver_viewer_main.py
python tools/scene_designer/scene_designer_main.py
/home/<User name>/.virtualenvs/<virtual env name>/bin/solver_viewer
/home/<User name>/.virtualenvs/<virtual env name>/bin/scene_designer
C:\Users\<User name>\.virtualenvs\<virtual env name>\Scripts\solver_viewer.exe
C:\Users\<User name>\.virtualenvs\<virtual env name>\Scripts\scene_designer.exe
2. Scene designer
A tool that is able to create and edit graphically scenes and save them as json files for future use. You can create a new scene or load an already existed one and then save it. Some tips:
Read the bottom banner of the gui for instructions
Add points with right click
3. Solver viewer
A tool that enables loading pre-created scenes and solvers, running the solver to solve the scene and visualize the paths, graphs and motion. The tool has three parameters:
- scene -
The scene to solve as a json file. It is loaded and presented graphically.
- solver -
The solver object/class to use to solve the scene. The name of the solver class as a string.
- solver file -
An external module that contains additional solvers to upload to the simulation. After uploading this file it is possible to select also the solvers in contains besides the default solvers. This is the path of the module to upload.
There are several ways to run this tool and pass it its parameters. Of course it is possible to combine the different methods and pass every parameter individually as you wish. After setting all parameters it is possible to run the solver and then visualize the paths if is was able to find.
The available ways to use the tool are:
3.1. From gui
The gui will open and from it, click the buttons to upload scene file, select solver type and upload solver file (if necessary)
Basic steps for using GUI of solver viewer (numbers are according to the picture):
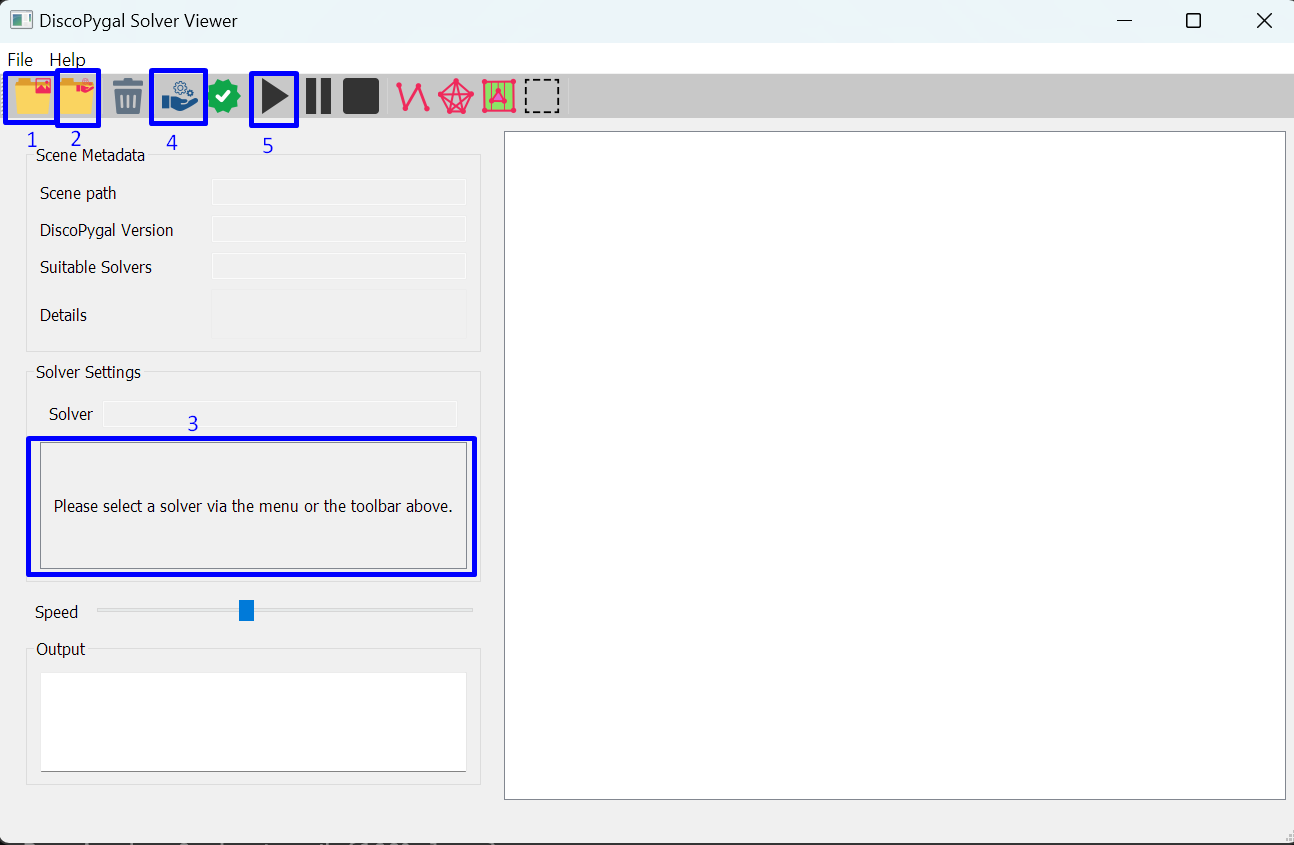
Upload a scene
Upload a solver to use (select from list, if using a custom solver from a python module upload the module first with the “Browse…” button and then your solver will appear on the list)
After uploading the solvers, it’s settings will upload in the highlighted box. Change the parameters as you needed
Execute the solver to solve the scene
Run the animation of the calculated solution (if found one)
More optional buttons allow you to: (from left to right at the buttons bar)
Clear the scene
Run validation on the solution (checks the paths are valid after running the solver)
Pause/Stop animation
Draw final paths
Draw roadmap/arrangement/bounding box used by the solver
Adjust the speed of the animation using the slider
3.2. From command line
It is possible to pass parameters from command line, and it will be loaded at startup.
usage: solver_viewer [-h] [-sc SCENE] [-sl SOLVER] [-sf SOLVER_FILE]

Solve a 2D scene

options:
  -h, --help            show this help message and exit
  -sc SCENE, --scene SCENE
                        Path to json scene file
  -sl SOLVER, --solver SOLVER
                        Name of solver to use
  -sf SOLVER_FILE, --solver-file SOLVER_FILE
                        Path of solver file to upload
Run the command:
solver_viewer -h
to see all options. All options are optional, an option that isn’t set won’t be loaded at startup and can be loaded manually afterwards from the gui. Note that it is possible to already choose in this step a solver from the given solver file.
3.3. From script
It is possible to invoke the gui from a python script with the function start_gui() from file discopygal_tools.solver_viewer.
The function receives three parameters, which are all optional (won’t set anything at startup if not given)
scene - The scene to upload. May be one of following:
strthat is a path to json file of sceneObject from type
Scene
solver - The solver to upload. May be one of the following:
solver file - A
strthat is the path to a module with solvers to upload
Note that it is possible to already choose in this step a solver from the given solver file.
Using this function in a script will be like this:
from discopygal_tools.solver_viewer import start_gui

start_gui()